Fabulous but freezing sunny day. Have fed the birds so now to catch up on my blog. I treated myself to a new camera yesterday ready to do lots of snaps for my blog.
I just opened an Etsy shop (
http://www.etsy.com/shop/KayLeverton) and it's getting a lot of attention and some queries on the how do you do that theme about the Scratchboard. So, here is my answer, I hope you find it useful/interesting.
Photo 1.
Tools of the craft. I know many scratchers use all kinds of tools but the most imortant thing is to keep the poinst sharp and start with a gentle touch. Once its scraped away ti never looks the same if you ink it in and do it again.
1. Before you can scratch you need your tools. So here above you see:-
Sketch Book
Tracing paper pad
soft cheap paint brush (to brush dust off your board and table)
putty rubber to remove trace lines
spare blades
basic box of blades
scrapertools
sharpening block
scraper board
white graphite paper (dressmakers tracing paper will do)
two pens,one red one blue/black. I use waterproof Uniball eye micro by Mitsubishi Pencil.co.uk. other makes are just as good.
any paper will do to sketch on, greaseproof paper to trace your image will do.
I get my Scraperboards, Cutting tools etc from
http://www.greatart.co.uk/ but the other things are mostly got from local shops.
The White Graphite transfer paper is by Royal Langnickel (RD201) and i found it in The Heaton Cooper Studio shop in the Lake District when I was on holiday there. (Oh what a paradise for artists that is.)

Photo 2.
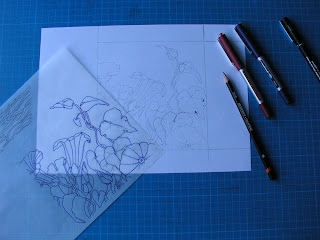
2. Trace your drawing.
First secure your tracing paper to the edge of the drawing so it doesn't move.
Trace your drawing, photo etc with a waterproof ink pen in red. Trace as much detail as you need to. You can raise one edge to see how it is progressing.
I start at the top left corner so I don't smudge the ink. I'm right handed. Continue until it is all done then carefully remove the tracing paper. Put your ref' photo aside for now.
Photo 3.
Transfer to Scraperboard.
I attach my s'board to a cutting boards reverse side as it is a good flat smooth surface. I use masking tape on all four sides overlapping by quarter of an inch, this leaves a nice black edge around your finished design.
Now lay your tracing onto the board and line it up how you want it and tape down one side to stop it slipping. Put your carbon paper between the two and using the Blue/Black pen begin in the top left corner to draw over the traced design. You will see easily where you've drawn as the red lines disappear under the darker colour.
Complete the drawing and remove it from your scraperboard.
Photo 5.
Begin to scratch.
You are now ready to scratch your design.
I of course assume you've done some practice strokes with all the little red handled pointy tools.
If like me you go in at the deep end you will learn by trial and error and maybe waste some boards but I have more patience now than I did two years ago.
Gradually work the design. I tend to go over the main components of the out line first with the flowers I do but that's just my way. I then fill in blocks lightly at first so I can judge the mid tones and work up the areas of pure white.
As you go along blow the dust away so you can see your progress and sweep it off with your brush not your hand. Do not get your fingers on
the board as they leave greasy marks which spoil the black areas.
I put a piece of kitchen roll under my hand when I work. As I complete sections I rub out the white lines of the tracing with my putty rubber to leave just the clear scatched lines.
A work in progress.
It takes me many hours to do one of these, this Morning Glory took approx' 42 hours, but you can start small with a little heart or a leaf, something simple then add a bit to it.
Play, I have not been good at this over the years but as I get older it seems more important to try to recover this element of exploring things.
and in closer, it's just like drawing but with the point removing the black instead.
and completed
I used the original tracing of the first version of this and then added new tendrils and leaves to it. Each copy is always different you just can't make it an exact copy even if you tried.
Footnote:
I have looked over this and realise it is quite hard to do these step by step things but you have to be there as they say, To see the strokes arrive and build up is intriguing but would make a boring post.
If you have any questions please email me.
 love to all, Kay


